
If you're visiting from Julie's blog...WELCOME! Yay! So excited to be able to share today's post with you! Today I'm going to share a photo ornament tutorial that I did for Julie's Holidays Handmade. You don't need much for this ornament...some stamps, a clear box and some holiday spirit!

You can use any smaller image stamp/digital sets, but I used Willem's fish over at AmberINK. Ok, they're not really called Willem's fish, but for those of you that are new to my blog I'll give you a bit of back history. My youngest, Willem is obsessed with fishing. Obsessed! When he learned that the prize for AmberINK's INKredible 21 day challenge * was a customized stamp set designed by Amber he was all over me to enter. why? He wanted fish stamps! LOL! Fast forward a bit and here is the set... Fish Wishes, but it will always be Willem's Fishies to me. LOL!
* by the way there is still some time left to enter this months challenge...Wrap it Your Way! Go enter!!! Also be sure to stop by AmberINKS blog and play along in Aloha Friday! Every Friday there is fun Aloha Friday post. And some weeks there may even be a prize up for grabs*
I had to laugh at teacher conferences when all his pictures and essays had fish in them. Yep, thats my boy! So I created this photo ornament for his teacher with what else, but FISH!

I found that The Container Store Amac boxes are awesome for this project. They come in a variety of sizes and colors, but I used the 2 inch square clear boxes. If you are unable to find the boxes, you could use any clear box. I've made a similiar project with a dollar store button box. Or even those clear boxes that the ipods come in would work wonderfully!
Next you'll need some photos and stamped images. I printed off a few of the digital image so that I could cut parts of the image out and layer them. You might notice that they're already colored. Yep, the wonders of photoshop! I used the paint bucket tool to add color to the parts of the image. I went in afterward and added colored pencils, ink and stickles to jazz them up. Adding the main color in photoshop really saved on my time and copic ink though. ;)

Here they are all jazzed up and cut out....
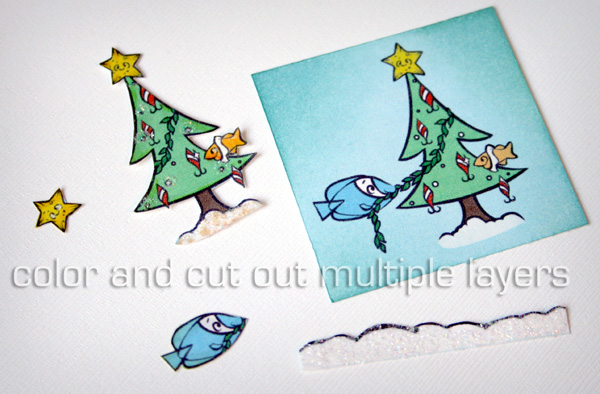
The next step is to adhere all the layers with foam adhesive. Don't worry about the foam adhesive showing from the side view. We're going to hide that with ribbon. All the extra layers and cutting might seem like alot of work, but it really goes fast and it adds so much depth to the ornament.

On the back of your scene adhere a photo. Place them inside the box. Insert a loop of fishing line into the box between the photo/scene. Close the box up, wrap the ribbon around the sides of the box and into a pretty bow. Sit back and enjoy your handmade ornament! You can customize it even more by adding the year onto the box with rubons.

A big thank you to Julie for letting me share my tutorial on her blog!!!! I have to say I have been so excited for this day! Have a great Friday everyone!!!
9 comments:
I bow before you and your genuis today...Over the moon cute!
These are incredible, Wendy! I love them!!
Me inclino también!
(My computer interprets my every thought - so cool!)
Your ornaments are darling and so creative! :)
These are super cute Wendy. Thanks for the inspiration!
Oh my wendy!!! wow wow!!! I, too, bow before you!
Such a sweet project! You're so good at making these hanging ornaments, thanks for the tip about the clear boxes!
Girl, these are fab!
What great ideas you come up with!
Love these-super cute!
Post a Comment