Showing posts with label Coredinations. Show all posts

Wednesday, December 10, 2014

Stampendous and Core'dinations Hop

Welcome back! Today I've paired up the new Stampendous Feline Curious stamp with Core'dinations cardstock for this  whimsical card. 


Supplies UsedP243 Feline Curious,P249 Vintage Note,P248 3 Elegant Scroll, Memento™ Tuxedo Black Ink, Core'dinations cardstock, Zip Dry Adhesive, Distress Inks, Spectrum Noir Markers (CG3, CG2, TN2, TN3, EB1, GB7),May Arts, twine and gesso


Instructions:
  1. Stamp Scroll on tag with Gesso. Dry.
  2. Ink tags with Distress Ink.
  3. Stamp tags with Vintage Note.
  4. Stamp Feline Curious. Color with markers and cut out.
  5. Adhere tags and cat to card base.
  6. Embellish tags with twine.


Be sure to visit the blogs and see what the Stampendous designers have created! 

Stampendous Blog

Kristine Reynolds

Wendy Price

Core'dinations Blog

Tuesday, December 9, 2014

Stampendous and Core'dinations Together...


One of my favorite papers right now is vellum! It can add just the perfect touch to projects. I heat embossed the new Stampendous Hummingbird Jumbo Cling set in white embossing powder. 

Supplies Used: Stampendous Hummingbird Jumbo Cling, Core'dinations Vellum, Authentique pattern paper, cardboard box


Be sure to check out what the rest of the Stampendous Design Team has whipped up...

Stampendous Blog

Kristine Reynolds

Pam Hornschu

Wendy Price

Lea Kimmel

Tenia Nelson

Core'dinations Blog


Friday, October 17, 2014

Stampendous and Dreamweavers Collaboration...


The Stampendous team has had a blast this week playing along with Dreamweaver Stencils and Core’dinations! 


This Stampendous Polar Slide cling stamp was perfect paired with the Dreamweavers Gothic Snowflake stencil! 

Now its time to check out what the other designs have whipped up. Ready, set...HOP! 

Team members with an (*) are also on the Dreamweaver Stencils Team.

Stampendous Impressions Blog 

Kristine Reynolds *

Jamie Martin *

Asia King

Wendy Price

Tenia Nelson


Janelle Stollfus

Lea Kimmel *

Pam Hornschu *

Amy Hurley Purdie

Core'dinations Designer Post - Tami Mayberry

Continue your blog hop at

Dreamweaver Stencils Blog

Thursday, October 16, 2014

Stampendous and Dreamweavers....


The Stampendous Design Team is excited to be joining  Dreamweaver and Coredinations to bring you a week of great inspiration!


These cuties are from the House Mouse's Star Spangled Mice stamp set. I trimmed the heads so they fit behind the Dreamweavers Nested Stocking Die.The stocking was cut from Coredinations red cardstock and sanded to give a distress look. I created the card base from Coredinations kraft cardstock. Dreamweavers Large Flourish stencil was used to dry emboss the design. I gave the design a quick sand when it was done to make it "pop". 


Stampendous Impressions Blog

Team members with an (*) are also on the Dreamweaver Stencils Team.

Tenia Nelson

Jamie Martin *

Lea Kimmel *

Pam Hornschu *

Core'dinations Designer Post - Suzanna Lee

Continue your blog hop at Dreamweaver Stencils Blog


Saturday, October 13, 2012

Stampendous & Core-dinations Blog Hop

Welcome back for our final day of Stampendous Core'dination Week! 


supplies used: 
Stampendous (Punkin Kitty)
Core-dinations (Black Magic cardstock, Sanding Kit)
Scor-Buddy
Tsukineko (Memento Ink)
Copics
*sentiment done on computer


I was really wishing I had a spider web embossing folder to use on my card. I'm on a tight craft budget, so if its a seasonal tool that I can't use all the time, you won't find it in my craftroom. I pulled out my Scor-Buddy and decided to create my own spiderweb. 

1. You will need a ruler or some clear straightedge to use as a guide. I found I had a difficult time, running my tool along the channels, when going on a diagonal unless I had a guide. I had a scrap of ClearScraps acrylic laying around from my last card and knew it would work perfectly. To make it easier to see on camera, I've inked the edge of the acrylic with a marker. 

2. Begin at a corner and score diagonal lines on the back of the Core-dinations cardstock. Hold the acrylic guide down with one hand, position it so it lines up at a set channel, and move your paper for each line.

3. Once your main diagonal lines are done, its time to move on to the connecting webs. I kept the spacing a bit wonky so it looks more natural. 


4. I penciled in lines, just so you can see my embossed lines. You do NOT need to pencil in lines, unless you find it easier to have a sketch to emboss. 


5. When your web is done, flip it over and sand. At this point, you could still go back and add more embossed lines in if you wanted more to your web. 


What do you think? Pretty cool, huh? 

Are you ready to see what the other designers have crafted up for you today? Be sure to leave some love on everyone's blog for a chance to win prizes and goodies! 

Wednesday, October 10, 2012

Stampendous and Core Hop...

We are playing with Core'dinations this week at Stampendous


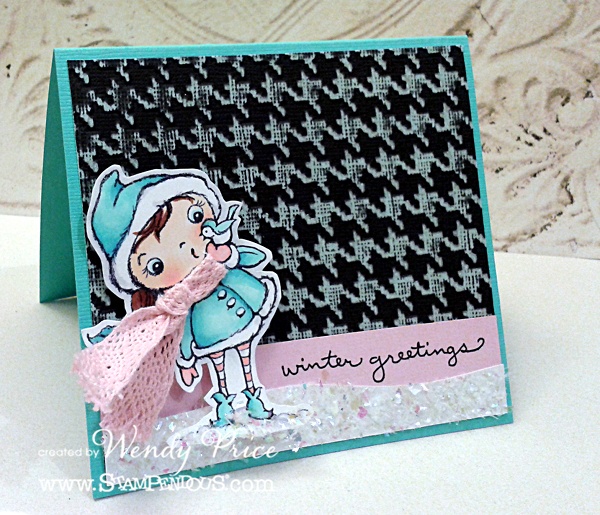
Dry emboss the cardstock and sand to reveal the aqua in the Core-dinations Black Magic with the Core-dinations Sanding Kit. Love that thing!

I cut a slit in the image and threaded a lace ribbon through it to create her scarf. 


supplies used:
Beacon (Zip Dry)
May Arts (ribbon)
ProvoCraft (Cuttlebug embossing folder)

Be sure to leave comments on all the blogs because we’ll choose random comments from random blogs each day this week. Then join us on Saturday when everything comes together in all new projects on a big huge hop! 

Andrea Amu

I'm entering this in the following challenges:
Loves Rubber Stamps- bling (shaved ice)
Papertake Weekly- All Creatures Great and Small (she's holding a tiny bird)
Lawnscaping- Texture

Friday, August 10, 2012

Core Cards Creative Frenzy

Hi everyone! I'm throwing my hat in the ring and going for the Core'dinations Design Team. You can't win it if you're not in it, right? 

This first card combines a bit of stamping, a bit of embossing and of course a bit of tulle. :)


The back of the Core'dinations papers are smooth and perfect for stamping on. I heat embossed Stampendous CRR138 Garden Cling in Purple Embossing Powder.

Next I went in and add just a bit of color with LuLu Lavender Memento marker and white colored pencil. 


The black background cardstock was embossed with a embossing folder, sanded and highlighted with Purple Hydrangea VersaMagic ink. 

My next project is a frame for my craft room, but this tag could easily be popped on a card front and make a darling card.  

To begin with cut 3/4 inch strips of Core'dinations Core Color and adhere them to a strip of scrap paper. 


When you get the entire piece covered, trim the paper and run it through your embossing folder. 

A bit of sanding and the design really pops. Here is the finished frame...


You might recognize this next card. I had it on my blog earlier in the week. I used a Dreamweavers stencil to emboss the butterfly design in the card base. 


You can really see the butterfly in this next project that I did this week for Paper Craft Planet.  Here it is burnt into the wood....


And here it is embossed on the Core'dinations cardstock. Adds a pop of color and really brings the butterfly design into the box. Head on over and leave a comment in the PCP post for a chance to win a Dreamweavers stencil. 


Tuesday, August 7, 2012

Skipping Stones Design sketch #1

For this week's Skipping Stone Design sketch we are going way back to Sketch #1. I decided it was only fitting that I pull out my first SSD stamp set, Healing Wings for the challenge. 


To create the butterfly, stamp your image and color it in. I colored the butterfly with Ocean Memento markers and Tea Dye Distress Ink. Cut your butterfly out. 

Thread twine through two stacked buttons.


Punch a hole in the center of the butterfly and thread your twine ends through to the back of the butterfly. 

Pull the twine snug and you have a butterfly with antenna. Adhere to the card with a pop dot. 

For the background of the card base, I embossed the design with Dreamweavers Butterfly LJ916 onto Coredinations cardstock. To make the butterflies pop, I sanded them a bit to highlight the core color. 

Here is this week's sketch if you'd like to play along. Be sure to link your projects to the Skipping Stones Design Blog.

I am entering this in the following challenges:
CASual Friday- things in the sky
SirStampALot- take flight
Paper Play- layers