Showing posts with label beacon. Show all posts

Monday, May 23, 2016

Clear Scraps Together layout...

Today I'm sharing a layout on the Clear Scraps Blog featuring their XL Deco Shapes. 

Instructions:
  1. Sand the top half of the XL Deco shape. Stencil white StazOn ink onto the sanded area with the Quilted Mascil. 
  2. Adhere pattern paper to the bottom half of the XL Deco shape. 
  3. Adhere pattern paper to the chipboard word "together".  Sand edges. Adhere to layout. 
  4. Sand acrylic heart. Color with alcohol marker. Adhere to layout.
  5. Die cut butterflies from vellum. Adhere to layout.
  6. Adhere photo and stickers to layout.

Clear Scrap Supplies Used:
Mini Heart Album
Other Supplies Used:
Beacon Zip Dry, Basic Grey pattern paper, Stampendous die cut, vellum, Tsukineko StazOn

Wednesday, October 21, 2015

Halloween Owl Wreath


Its no secret that I love decorating for Halloween! The Clear Scrap Acrylic Owl Album is the perfect size for adding to a Halloween wreath!

I used the front of the acrylic album and one additional page to create the owl. For the solid acrylic owl piece, I sanded the front of the acrylic and then airbrushed orange alcohol markers through the Chevron Mascil to create a design for the belly. I airbrushed the cover piece owl (the one with cutouts for the eyes and belly) with a black alcohol marker. The eyes, feet and beak are cut from cardstock. 


The Chipboard Owl Album and Mini Acrylic Owl Album would be really cute to use as decorations for Halloween also! 

Supplies Used:
Clear Scraps Owl Album
Clear Scraps 12 inch Chevron Mascil
Stampendous Leaf Diecut Set
Spectrum Noir alcohol markers
Beacon Adhesive
Ranger Distress Inks
DIY/3 Rings Coco Fiber Craft Wreath 
acrylic paint/gesso

Tuesday, September 15, 2015

Summer Birthday Layout...

Today I'm sharing a layout I created using the  nail polish water marbling technique on a Clear Scraps XL Dot Shape to create an end of summer beach layout. A tutorial on Water Marbling on Clear Scrap Acrylic can be found HERE. 


The nail polish effect on this piece reminded me of water so I thought it would make a great background for a beach layout. 


Supplies Used:
Beacon Zip Dry adhesive
nail polish

Tuesday, August 18, 2015

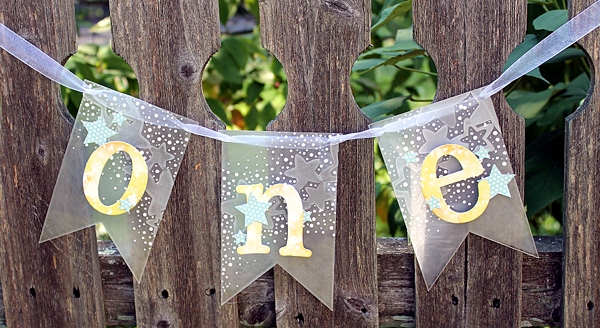
Baby Birthday Banner


I'm up on the Clear Scrap Blog today sharing this cute Birthday Banner for a baby's first birthday! 


Directions:
  1. Sand one side of the banners with sand paper. 
  2. Sand both sides of the star borders. 
  3. Adhere star borders to the un-sanded side of the banner with Zip Dry. Trim edges.
  4. Add dots of acrylic white paint of various sizes using a toothpick or embossing tool to banner.
  5. Ink chipboard letters with Distress ink. Splatter with water and white acrylic paint. Allow to dry.
  6. Adhere letters to the banner with foam adhesive. 
  7. Embellish with die cut stars.

Supplies Used:
Beacon Zip Dry
Distress Ink


Monday, September 15, 2014

Clear Scraps and Echo Park Blog Hop...

I'm so excited that Clear Scraps is playing along with Echo Park this week! I loved the happy bright colors in the Simple Life Collection! 


I did a little happy dance when I realized the pocket page images fit Clear Scraps Recipe Stand perfectly! I used a mix of the pocket page images and pattern paper to cover all the chipboard. 


I used the 6" Stripes Mascil to add Embossing Paste to the Small Star Embellishments. While it was still wet I sprinkled glitter on and tapped off the extra. I layered them through out the mini book on the acetate pages. 


I loved the matching stickers in the Echo Park Simple Life Collection and used them to decorate both the pages and tabs on the acrylic dividers. 


Supplies Used:

Monday, November 18, 2013

TSG-Winter Fun

This week's There She Goes Challenge is Winter Fun! I used the adorable Wonderful Winter Wishes set by Torico to create this tag! 


Supplies Used: There She Goes (Wonderful Winter Wishes), Stampendous (glitter), Lindy Scraps (Bachelor Button Blue Starburst, Azure Sea Asters Starburst), Luminarte (Radiant Rain Solar Gold), Tsukineko (Memento Ink), Beacon (Zip Dry), Copics, (C1,C3,C7,E00, E53,Y15,YG23,YG67,B00,0), Blick Studio (Antique White, Cerulean Blue, Walnut), black colored pencil


To be eligible for the giveaway, create a NEW card or project using this week’s challenge theme, Winter Fun, and then head to the TSG Blog to add your name and a link to your project in the InLinkz that is located at the bottom of the challenge post. This challenge is open until 11pmEST on the Sunday before the challenge end. The winner will be announced on the following Monday (November 25th). The winner will get a $5 gift certificate to use in the TSG Web store!

Wednesday, November 13, 2013

Clear Scraps and Lindy Scraps Blog Hop

Its Day 3 of the Clear Scraps and Lindy Scraps Blog Hop! I tend to be a simple scrapper, so when I get to roll up my sleeves and get dirty its always fun! 


I started with a sheet of white cardstock and started spraying Lindy Scraps Bachelor Button Blue Starburst, Buccaneer Bay Blue Moon Shadow Mist, and Azure Sea Asters Starburst till I got a mix I was happy with. I let some of the colors run and drip. I open up some of the bottles and splattered some of the colors. 


I added journaling with a sharpie. A trick to straight journaling on your acrylic sheets... notebook paper! 


Supplies Used: Clear Scraps (acrylic blank 12 x 12 sheet, Family Expressions), Lindy Scraps (Bachelor Button Blue Starburst, Buccaneer Bay Blue Moon Shadow Mist, and Azure Sea Asters Starburst), Stampendous (Cling Wild Rose), SEI (gold tape), Beacon (Zip Dry)

Sunday, November 10, 2013

Happy Holidays to You...

Well we've seen our first Christmas commercial so that must mean it's time to start making Christmas cards! 


I LOVE using acrylic in my cards. Using a piece of acrylic as a "peek through" on the front of the cards is a fun surprise for the recipient! They might look hard, but they're surprisingly easy.


You'll need: a card base, pattern paper cut to fit inside the card, a piece of acrylic trimmed approximately half the card height, and cute stuff to decorate the card with! 


Directions:
1. Lay Mascil on acrylic and spread on embossing paste. Lift mascil and sprinkle on glitter while the paste is wet. Allow to dry.
2. Adhere your pattern paper to the inside of your card. 
3. Lay your scrap of acrylic on your card front and mark 1/2 inch down from the top of the acrylic. When you trim away the front this will give you a border to adhere your acrylic to. 
4. Trim your card front at the line you marked. 
5. Adhere acrylic in place with Zip Dry. Adhere strips of pattern paper to the top and the bottom of the card. 
6. Embellish with stickers, stamped image, and twine. 


Supplies Used: Clear Scraps (12 x 12 acrylic blank sheets, Snowflake Mascil), Crafters Companion (Just For You), SEI (Chalet paper and sticker), The Twinery, Stampendous (Glitter), Dreamweavers (Translucent paste), Beacon (Zip Dry), markers and colored pencil

Markers Used: Spectra Noir (CR8), Copics (C1, C3, C7, YG23, YG67, blender), Blick Art (Antique White)

I'm entering this in the following challenges:
•Crafters Companion- Christmas cards
•Graph it- Furry Friend