Showing posts with label distress inks. Show all posts

Thursday, December 31, 2015

Goodbye 2015, Hello 2016!

As 2015 draws to a close and 2016 is just hours away, I want to take a minute to wish everyone a healthy, happy and wonderful New Year!!!


I inked up a white card base with Distress Inks in rainbow order. Next I sprinkled water over the ink to create a distress effect. 

I die cut 2016 from white cardstock and  trimmed it to fit the card on a diagonal. I colored the white cardstock with Spectrum Noir Sparkle pen in Clear, wrapped it with ribbon and adhered it to the card with foam adhesive. 


Supplies Used:
Ranger Distress Ink (Festive Berries, Ripe Persimmon, Squeezed Lemonade, Mowed Grass, Salty Ocean)

Saturday, September 27, 2014

Crafters Companion September Challenge

If you haven't gotten your entry in there are still a few days left in September to enter the Crafters Companion Autumn Challenge


To create the left side of the card, ink up cardstock with your favorite fall colors. I used Peeled Paint, Mustard Seed and Spiced Marmalade. Splatter with water and dry. When it was dry I stamped a text background randomly. 

Supplies Used:
Sheena (Busy Doing Nothing)
Stamp It (Dragonfly Delight)
Distress Ink (Mustard Seed, Spiced Marmalade and Peeled Paint)
Spectrum Noir (OR1, CT4, CG2, IG1, IB1, EB1)


Tuesday, September 23, 2014

The Secret Staircase...


I'm excited to be sharing one of the newest Brambly Hedge stamp sets that Crafters Companion just released today...The Secret Staircase! 


Supplies Used:
Crafters Companion Brambley Hedge
Spectrum Noir (EB1, EB2, IG1, IG5, IG7, DR4)
Distress Ink (Seedless Preserves, Gathered Twigs)

Sunday, September 21, 2014

Happy Haunting

I am loving the new Crafters Companion Halloween stamp sets! Today's card features Happy Hauntings. 


Supplies Used:
Distress Ink (Dusty Concord, Seedless Preserves, Black Soot)
Spectrum Noir Markers (IG1, IG3, IG6, CG2, HB3, HB2, DR1, EB2, CT4)


Friday, August 22, 2014

All that glitters is snow...

Today's card features the fabulous Crafters Companion Vintage Christmas Sentimental set Let It Snow and Stamp Its Falling Snow.


I love creating backgrounds with Distress Ink!

Supplies Used:

Sentimentals Vintage Christmas - Let it Snow
Stamp It- Falling Snow
Distress Ink (Salty Ocean, Peacock Feathers, Faded Jeans)

Monday, August 18, 2014

Birthday Wishes...

Today's card features that cute little Crafters Companion Bebunni,one of my favorite flourish stamps in the Sheena A Little Bit Sketchy Wrought Iron and the newest Die'sire .


Supplies Used:
Spectrum Noir markers: IG1, IG3, BT2, BT4, OR1, CT4
Distress Ink
Veramark
Clear Embossing Powder

Wednesday, August 6, 2014

Snowy escape....


How about a little snow to cool down in the middle of this hot summer? Crafters Companion has four new Sheena Douglass A Little Bit Festive stamp sets! 


Supplies Used:
Crafters Companion Sheena- Country Christmas
Distress Inks (Faded Jeans, Tumbled Glass, Old Paper)
Imagine Crafts- Memento

Tuesday, August 5, 2014

Acrylic Star Frame...

We recently lost one of our rats to tumors. She was my heart rat. The one that stole my heart and convinced me that rats make amazing pets. Today's project uses Clear Scraps Book Stand, Crafters Companion Die'sire Essentials Star Die and a whole lot of Distress ink to create a free standing frame for her photo.  


I started by inking white cardstock with a rainbow of Distress Inks. Next I splattered water drops onto the inked paper. I watered down some white acrylic paint and splashed that on the paper also. This is one of my favorite techniques with Distress Inks. Not only does it create a fabulous distressed effect, but it also hides when you're inking coverage might be a bit less than stellar. 


Next I die cut stars, LOTS of stars, using Crafters Companion new Die'sire Essentials Star Die. 


Position the frame on your worktable, so the stand hangs off the edge. This will allow you to work horizontally and play around with position of your pieces before adhering them down.  Leave the protective coating on the back until you are done to protect it from scratches.You might be wondering what the lined paper is for. I simply drew lines on scrap paper, positioned it under the acrylic Book Stand and it gives me a guide for placement of the stars. 

Monday, July 28, 2014

Playing With Stack Art

The Stampendous team is playing with Stack Art this week. If you haven't had a chance to play with Stack Art yet you have to give it a try! Its a great way to try your hand at mixed media.


Instructions

  1. Stamp Tomb Elements in Memento Ink. Cut out skeleton part of the image. 
  2. Stamp wings from Stack Art Angel Wings in Versmark and emboss with Stampendous Black Embossing Powder. Adhere to back of skeleton. 
  3. Stamp Halloween Wish sentiment. Color panel with Dusty Concord Distress Ink. 
  4. Adhere skeleton image to the sentiment panel. 
  5. Ink white cardstock with Silvery Shimmer Delicata, Dusty Concord, Black Soot Distress Ink. Splatter with water. 
  6. Stamp spider web from Halloween Diamonds on background.
  7. Adhere sentiment panel and skeleton to the card front. 


Supplies Used
Zip Dry™ Paper Glue by Beacon Adhesives
Tim Holtz® Dusty Concord, Black Soot Distress Ink by Ranger®


Friday, July 25, 2014

A Little Bit Festive sneak peek...


I have a sneak peek for you of new Sheena A Little Bit Festive Sets from Crafters Companion. I loved the star image in the City Christmas set and used it to create my background design. 


Supplies Used:
Sheena- A Little Bit Festive (City Christmas, Christmas Elements)
Distress Inks (Faded Jeans, Broken China)

Thursday, July 24, 2014

Gone Fishing...


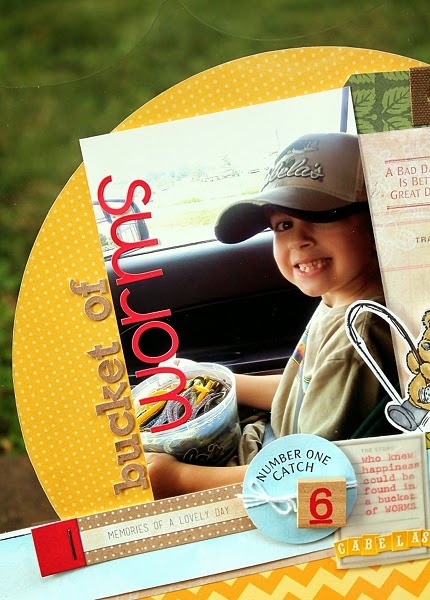
Hi everyone! Sharing a layout I did featuring Clear Scraps XL Deco Shape and Crafters Companion Mulberry Wood Gone Fishing. 


Love this photo! DH took it on the ride home from Cabela's, back when they first started fishing. DS was SO excited to get this large bucket of worms. To him it was a bucket of possibilities. 


Here's a closeup of the stamped image. I extended the bank by simply drawing a pen line. Now the stamp fits perfectly with my layout!


Supplies Used:
  • Clear Scraps (XL Deco Shape)
  • Creative Companion (Mulberry Wood Gone Fishing Stamp
  • Spectrum Noir markers: EB1, EB2, CG2, CG3, TB1, IG1, IG3, IG5, EB6, Blender
  • UmWow Chipboard
  • Quick Quotes pattern paper
  • Basic Grey stickers
  • Doodlebug stickers
  • Distress Ink (Salty Ocean)

Tuesday, November 13, 2012

Skipping Stones Design Sketch 154

Its time for another Skipping Stones Design sketch challenge! This next sketch was a little tricky for me but I love the end result. 


Supplies Used: Skipping Stones Design (Wise Men, Christmas Song, Sentimental Seed), Authentique pattern paper, Distress Inks

Idea to Note: To create the half circle design, I cut a circle in a piece of scrap paper and used it as a mask to do my stamping and inking. After inking with Distress Inks, I flicked water on the card to create the mottled effect. 


We'd love to have you play along with us this week. Be sure to hop on over to the Skipping Stones Design blog to check out what the design team has whipped up.

Friday, October 19, 2012

Masking with ClearScraps

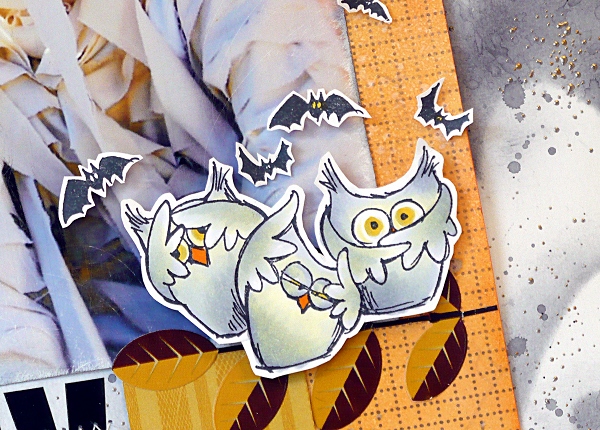
Hi everyone! Today I'm sharing a layout that was up on the ClearScraps blog earlier this week. I used the ClearScrap Bat Album pieces as masks along with those cute Stampendous Owls to create a Halloween page! Be sure to stop by the Clear Scrap blog to check out how I created the background paper! Not only is it easy, but it will give you double the use out of your supplies! 


supplies used: Clear Scraps (Mini Bat Album, Small Pennant Banners), Stampendous (Owling Good Time Cling, Aged Silver Embossing Enamel ), Basic Grey pattern paper, Reminisce Pattern Paper & Stickers, May Arts twine, Ranger Distress Inks (Black Soot), Beacon Adhesive (Zip Dry)


These cuties are no longer available on the Stampendous website but are still readily available online. 


I added a bit of zig zag stitching through out the entire layout to add to the whimsy. 


Aren't these Clear Scrap Pennants cute? I added a few more of the bats from the Owl stamp to the banner to bring the design to the top quadrant of the layout.