Showing posts with label derwent. Show all posts

Wednesday, March 27, 2013

Penelope/Nutmeg/Journal Lines Blog Hop...


This month we are introducing a BRAND new artist to There She Goes, Megan Suarez!! She has started us out with three FABULOUS stamp sets, which we think you are going to love. Her style is a touch on the side of gothic, but so much fun. We are starting out with three new sets from her and we can’t wait to see what’s next with this AMAZING designer!!


Penelope & Birdcage is a 3x4 set that includes a total of 4 stamps and will sell for $9.00.

supplies used: There She Goes (Penelope and Birdcage), Bo Bunny cardstock, Authentique patten paper, Copics, Derwent Inktense pencils, glitter


Nutmeg is a 3x4 set that includes a total of 5 stamps and will sell for $9.00.


supplies used: There She Goes (Nutmeg), Basic Grey pattern paper, Distress Ink (Black Soot) dry wall tape

idea to note: place dry wall tape down on paper and ink. Pull up the dry wall tape and you're left with a grungy mesh pattern.


Journal lines is a 3x4 set that includes 1 stamp, and will sell for $9.00.

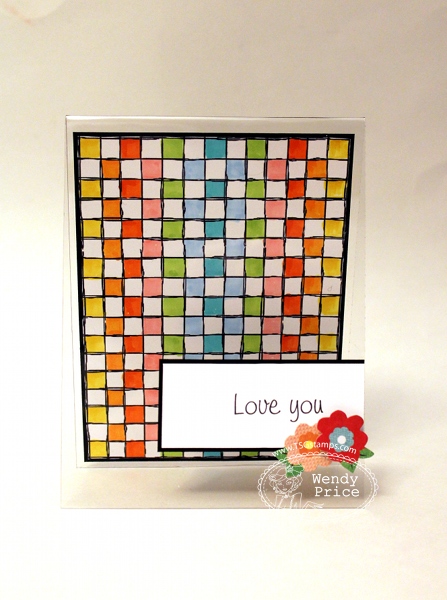
supplies used: There She Goes (Journal Lines), Basic Grey flower stickers, Copics, Clear Scrap acrylic sheet

idea to note: use the journaling line stamp to create a grid design by stamping both vertically and horizontally. 


Would you like to win all three new stamp sets from Megan Suarez(Penelope&Birdcage/Nutmeg/Journal Lines)? Here is what you need to do- visit the Trendsetter’s blogs that are participating in each of the blog hop challenges below and comment on their creations as you go. One of the Trendsetter’s blogs (from each hop day) will be randomly chosen as the ‘it’ blog and a winner will be picked using a random number generator from the comments left on that Trendsetter’s Blog Hop Challenge post

You will not know which blog has been chosen so the more you comment on the better your chances are of winning new stamps! The Blog Hop Challenges will be open until 5 PM Eastern Time Saturday, March 30th with the winner being announced during the release party chat.

Tuesday, March 26, 2013

Recycling Packaging...

Hi everyone! Wendy here and today I'm going to show you how to recycle the Powder Puff Ink box into a stationary set.


After unpacking and organizing all my new Powder Puff inks, I couldn't help but notice the cute packaging. Instead of throwing it away, I saved it hoping to find a use for it. 


Instructions: 
1. Cover the lid with black cardstock. A trick to figuring out where to cut the window is to ink the lid with Coconut White Powder Puff ink. Now turn the lid upside down and press it onto the cardstock. This will leave an inked outline of the window. Cut slightly larger.


2. Embellish with pattern paper and kraft cardstock. Ink edges with Coal Miner Powder Puff ink. 


3. Using the Kiwi Lane Design Cascade Border template, cut a band for the box front. Ink edges and adhere to box lid. 

4. Stamp floral image, color and cut out. Adhere to the box lid with foam adhesive. Embellish with a twine bow. 

5. Create matching cards using Cracklin' Rose Collection and Kiwi Lane Tags. 


Quick Quotes supplies used: 
•Powder Puff ink (Coal Miner, Coconut White)

Other Supplies used:
•Kiwi Lane (Cascade Borders, Tags)
•Stampendous (Rose Cluster Cling)
•Derwent Inktense Color Pencils
•Archival Ink, Versamark ink
•Clear Embossing Powder
•twine

Wednesday, November 28, 2012

DIY Bangles and Stampendous Week...

Its no secret...I LOVE working with DIY Bangles' wood products. Well this week, is a fun one because the Stampendous team will be playing with their bangles and wreath blanks all week! 


I used the NEW Stampendous Cling Jumbo Spring Bouquet to wood burn on a Flat Exterior Bangle. Stamp your image in a light brown ink and then trace over the ink lines with the woodburning tool. 


When I finished woodburning the design, I colored the image in with Derwent Inktense pencils. 


A bit of antiquing glaze on the inside, gives a nice rich tone. All that is left to do is finish the bangle off with a coat of varnish. 


Wednesday, August 22, 2012

Quoth the Raven...

I'm sure I've mentioned it before, but I love Halloween! I can't wait to decorate! It might be too soon to start decorating my house for Halloween but its not too soon to share a Halloween card that I created for Stampendous. 


Supplies Used:
Stampendous P166 Nevermore
Stampendous Crystal Glitter
Ranger Archival Jet Black Ink
May Arts ribbon
Bazzill cardstock
Derwent Inktense Watercolor pencils
Glossy Accents
1 inch circle punch
cork

Directions:
1. Create base base from black cardstock.
2. Stamp image on cork. Round corners and adhere to card. 
3. Adhere crystal glitter to card . 
4. Stamp image on white cardstock. Color and cut out bird. Adhere to card on foam adhesive. 
5. Punch circles from cardstock. Line up to create rows of scallops. Trim and adhere to card.
6. Embellish with ribbon.


Saturday, May 19, 2012

Stampendous Tropical Bangle

Good morning and welcome back for another Stampendous Saturday! This months theme is GIFTS. Today I'm sharing a bangle that I created for the last Stampendous catalog that would make a great gift for someone special. 


Supplies Used: Stampendous Cling Jumbo Tropical Garden and DIY Bangles Dome Exterior unfinished wood bangle, Derwent Inktense watercolor pencils, Ranger Archival Ink, Plaid Mod Podge, Walnut Hollow Varnish

Instructions: 
  1. Stamp flowers on tissue paper. Color with watercolor pencils. Cut out.
  2. Adhere tissue paper to painted bangle with mod podge. 
  3. Wash with a coat of white paint. Wipe off extra. 
  4. Age with a coat of antiquing gel medium. Wipe off extra.
  5. Seal with varnish.

Be sure to check out what my teammates have created for the challenge today!


And we want YOU to play along with us!  Simply make a gift, gift set (could be cards, could be an altered item), or a gift card holder of some sort and add the direct link for your project to our collection at the end of this post (or on the Stampendous blog) no later than Thursday, May 31 at 11:59 PM EST .  You do not have to use Stampendous products, but we sure love it when you do!  As an extra incentive for playing along, one lucky crafter (drawn at random) will receive this fabulous new Cling Jumbo Tropical Garden stamp set:


Due to shipping restrictions, the winner must have a US address.  We hope you have a chance to play along with us (you an enter as many times as you'd like!) this month...Happy Crafting!

Pin It

WAREHOUSE SALE: If you're in the Anaheim California area, be sure to stop by the Stampendous warehouse and stock up on some fabulous craft goodies today. More info can be found on the Stampendous Blog.


Saturday, August 27, 2011

Stampendous Saturday Blog Candy

Good morning and happy Saturday! Its time for another Stampendous Saturday! Summer is wrapping up and I have one more chance at winning some goodies from Stampendous. Before I get to the project and prize, how about we announce last weeks winner.....
 cg said...

Oh my goodness, this is so lovely. I love stamping on clay!
Congratulations CG. Be sure to email me your mailing address so Stampendous can get your stamp set off in the mail to you!

Today's project is another that I made for CHA. If you haven't tried stamping into Deep Impression Embossing Powder yet, you HAVE to try it! Fun technique! 


Supplies Used:

Instructions:
  1. Paint chipboard tag with acrylic paint and watercolor pencils. 
  2. Coat entire surface on tag with Versamark and cover with Deep Impression Embossing Powder. Heat with heat gun until melted. Repeat until you have 4-6 layers of Deep Impression Embossing Powder on the tag. optional: sprinkle a bit of Shabby White Embossing Powder into the last layer of Embossing Powder. You can also sprinkle in glitter or mica powders at this point. 
  3. Ink up the Cling Saint Nick stamp with black ink. Reheat tag. While the Deep Impression Embossing Powder is still melted, press stamp down into the embossing powder. Let sit for approximately 15-30 seconds. 
  4. Carefully lift stamp from tag leaving an impression of the stamp into the Deep Impression Embossing Powder. 
  5. Embellish with ribbon/twine. 
This week I'm giving away a Stampendous Jumbo or Clear set of your choice! To be elegible to win leave me a comment in this post. We'd love to have you follow Stampendous on Facebook or their blog! I'll pull a winner next Saturday. Good luck!

And for even more Stampendous blog candy, stop by these blogs: Pam HornschuWendy JordanCyndi BundyTaylor Usry, and  Lynn Mercurio.