Showing posts with label Paper Craft Planet. Show all posts

Thursday, July 11, 2013

Dreamweavers Hop- Faux Postage Card...

I have been wanting to try creating faux postage stamps for awhile now, so when I saw the Dreamweavers Large Tile stencil I was excited to give it a try!


I kept the stencil in place while inking the paper with Shabby Shutters and Antique Linen. I spritzed it with a bit of water. Next,  I made a wash of Broken China with water and splattered it over the stencil. Dry with a heat gun. I stamped a collage of stamp images over the entire stencil. The last step was to stamp the main image in black ink and color with pencils.


I have a tutorial on how to create the faux metal embossed button over at Paper Craft Planet...HERE


Using Translucent Embossing Paste and the large flourish stencil, I added a bit of detail to the corners of the cardbase. 

Now you know what to do. Its time to HOP. 
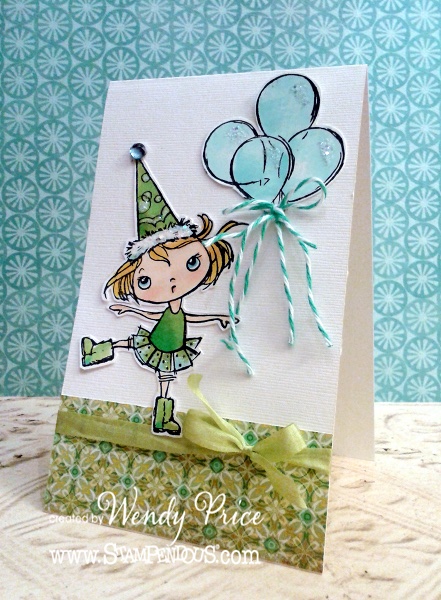

Thursday, February 21, 2013

Faux Metal Buttons at PCP

Hi everyone! Sharing a card that I created for Stampendous. I recently shared a tutorial over at Paper Craft Planet for creating the faux metal button on this card. 


You can check it out at Paper Craft Planet Faux Metal Buttons. Here's a closeup of a few faux metal buttons I created. Its a fun way to use those stamps. 


Stamps Used: Stampendous Cling Morning Glory, Color Outside


Monday, October 22, 2012

Happy Birthday Susanna

Today, October 22nd, we are celebrating our Paper Craft Planet leader, Susanna Boyd's, birthday with a week-long Blog Hop celebration that every member on the Planet can participate in!


The Super Novas got together and each made a special birthday gift for Susanna's birthday.  In honor of this momentous occasion, we invite everyone to join in the hop and post a birthday greeting on each of their blogs for a chance to win some fun blog candy!  Extra points for commenting on the designers’ projects too!


So, join us for Susanna’s birthday party celebration from October 22nd that ends on October 28th.  Random winners will be announced on Monday, October 29th  on each designer’s blog.

HAPPY BIRTHDAY SUSANNA!

If you'd like to play along and give Susanna some birthday wishes, just create a card or a little giftie, post it to your photo gallery with the tag SBOCT22 (exactly as typed)

I'm entering this in the following challenges:
Basic Grey Challenges- Sparkle

Monday, July 30, 2012

Getting techie with stkr.it

Today I'm sharing a tutorial over on Paper Craft Planet about bring media into our scrapbooks and projects. Be sure to check out Stampendous for more adorable projects featuring stkr and the newest stamp releases! 


Those of you who know me well, know that I am not the most techie person there is. We JUST got smartphones this year. When I had the chance to play with stkr, I was a bit nervous. I wasn't sure if I could figure it out. I have to tell you I was nervous for nothing because it is EASY! It literally is a matter of entering a code and picking the media you want linked to the code. For complete instructions check out the tutorial at Paper Craft Planet

Want to check out the video? Go ahead and scan the code on your computer monitor. How cool is that!?!?


Supplies Used: Stampendous( Fishing Kiddo Cling, Jumbo Pinecone Bough Cling, Travel Words, Tweet Top Hat Cling and Treasures Glitter), stkr.it , American Craft chipboard stickers, Tsukineko (Spanish MossVersafine, Aspen Blue VersaMagic and Momento), Copics, Colored Pencils, Bazzill Cardstock


I'm pretty sure I literally squealed with excitement when I opened up my Stampendous Design Team box and saw this adorable Kiddo. He's called Cling Fishing Kiddo, but I'm calling him Willem. You can find him and all the other new release stamps on the website now. 

Friday, July 27, 2012

Stampendous Catalog Week and PCP sketch Challenge

Welcome back to Day 5 of Stampendous Catalog Release Week. Don't forget to comment on my Sk8r post to be entered into my giveaway. I'll be pulling and announcing a winner on Saturday's post. 


Supplies Used:
Stampendous Glitter
May Arts Ribbon
Tsukineko Memento Ink
Ranger Distress Inks
Copics


Instructions:
1. Stamp Crowned Angel. Color. Cut out.
2. Ink background image in Jumbo Amaryllis with a variety of Distress Inks. Spritz with water and stamp. Repeat to create background.
3. Adhere stamped background to card front.
4. Stamp sentiment. Cut out.
5. Add ribbon to card front.
6. Adhere sentiment and Crowned Angel to the card front.

Did you know that Paper Craft Planet has brought back their Sketch Challenges? We're excited to have you join us. You can find all the information on Paper Craft Planet. Here is this week's sketch...


A few of my teammates are showing off new products from Stampendous as well! Not only do some of them have their own blog candy, Stampendous will be drawing a winner for this great prize pack.


How do you win it? It's easy! One of the featured bloggers today will be choosing a random commenter from her blog, and that lucky person will be announced on the Stampendous blog tomorrow. The more places you leave a comment, the better your chances are to win! Below is the list of team members who are sharing inspiration today:

Stampendous Impressions
Kristine Reynolds
Jennifer Dove 
Taylor Usry (has blog candy)
Jan Garber
Lea Kimmel 
Pam Hornschu (has blog candy)
Rhea Weigand
Wendy Price
Tenia Nelson
April Derrick
Krissy Fossmeyer

Friday, June 22, 2012

Glitzy Stenciled Butterfly...

I've been playing with Dreamweavers stencils again! I have a tutorial up at Paper Craft Planet on Wet Embossing with the Stencils. Be sure to check it out and enter the giveaway there for a chance to win some Dreamweaver stencils to play with. 


I love the effect of the Stampendous Crystal Embossing Powder on the butterfly! Sparkly! I've been experimenting a lot recently with this Crystal EP. I love the glitz of glitter, but don't always like trying to keep it adhered to my project. My room looks like a glitter mess after I get done working with regular glitter. No worries of stray glitter with the Crystal EP because the glitz in the EP. 


Saturday, June 9, 2012

Paper Craft Planet and The Doodle Garden...Giveaway

This week I had the opportunity to create a tutorial for Paper Craft Planet and The Doodle Garden. Jennifer Nilsson, the artist behind The Doodle Garden sketches up some amazingly adorable artwork! Head on over to Paper Craft Planet to find out how you could win 5 digital images of your choice!


Supplies: The Doodle Garden (Little Sailor Boy), Copics (C1, C3, C7, E37, Boo, B02, B05, E00, R32, R29, Y15, Y000), Bazzill cardstock, Bo Bunny pattern paper, Pebbles pattern paper, ribbon, cigar box)


Directions can be found over at Paper Craft Planet. 


The contest will be open until Thursday, June 14th midnight EST. So hurry on over and check it out!

Thursday, May 31, 2012

Paper Craft Planet Dreamweavers Thursday Tutorial

You all probably know how much I love using butterflies in papercrafting, so when I had the opportunity to work with some new Dreamweavers Stencils, it was a no brainer. That Large Butterfly Stencil and Maidenhair Fern  were calling my name! Today I'm sharing a Dreamweavers Thursday Tutorial with you at Paper Craft Planet on Embossing with your Light Box. Stop by, check it out and enter the giveaway! You might just win your favorite Dreamweavers stencil! 


Here is a the completed layout I created using the Maidenhair Fern and Butterfly...


Tuesday, February 21, 2012

Paper Craft Planet and i{heart}paper CHA hop...

As new products are quickly starting to hit the shelves, Paper Craft Planet and i{heart}paper are teaming up to bring you a peek at the trends and themes that Winter CHA 2012 brought. Here are some of the most prominent trends at this CHA show...
  • Chevrons
  • Paris
  • Travel themed products
  • Sewing is still very hot
  • Quilt patterns as paper backgrounds
  • City skyline
  • Pinwheels and Flowers and Butterflies (oh my… typical Spring)
  • Pennents
  • Twine
  • Small sticker letters
  • 3d embellishments — lots of small wooden shapes, and cut & fanned paper


I had the opportunity to play along with My Cute Stamps Paris stamp set! This set is absolutely adorable from the Eiffel Tower to the cute little poodle. Since Travel and Paris was a popular theme at CHA I decided to use that for my inspiration. 

Clouds were another popular trend at CHA. To create the clouds, I freehand cut a cloud shape out of scrap paper and used it as a stencil when inking Broken China on the one side of the card.

I did something a bit out of my comfort level with this card...its ONE layer! I masked off left side, and stamped out the word Paris repeatedly in Memento ink. I outlined each word in a light grey Copic and then inked the entire section with Black Soot Distress Ink. When I was done with the right side, I masked off the right side and stamped the Eiffel tower. After coloring it with Copics I inked the clouds with Distress Inks. All that was left to do was add a bit of tulle.


Ready for some more inspiration? Check out the rest of the Planet Super Novas and our friends at i{heart}papers for some other great paper crafting trend ideas:
i{heart}paper DT members:
and the supernovas at Paper Craft Planet:

I am entering this in the following challenges:

Simon Says Stamps- Paris

Saturday, February 18, 2012

Paper Craft Planet & Stampendous...

Good morning and happy weekend!!! For this weeks Stampendous texture challenge I'm sharing a layout I created for this week's Paper Craft Planet Tutorial...Getting More Bang for your Buck with Stamps. In the tutorial I show how to creatively mask your stamp images to create new images. Read on to find out how you can possibly win some of the stamps used in this layout! 


After I did all the stamping and coloring, I sprinkled a mix of embossing powders on the layout and heated from the underside. Great way to add a bit of texture to your layouts!


Have I mentioned my love for Stampendous Crystal Glitter? I coated the punched border with wet adhesive and then dumped lots of Crystal Glitter and Gold Halo Glitter over it. Sparkle!!! 


To create the strip of gold, I laid down a piece of redline tape and added glitter. 

Check out what the Stampendous Design Teams have created for inspiration...
We want YOU to play along with us! Just add your direct link to your card (make sure you’ve loaded it up with tons of TEXTURE) to the Changito Button linky tool below no later than March 1, 2012 at 11:00 PM EST. You do not have to use Stampendous products to play along, but we sure love it when you do! And as an extra incentive for playing, one lucky person (drawn at random from all the entries) will receive the gorgeous Corset Ladies Perfectly Clear Stamp Set!

Due to shipping restrictions, the winner must have a US address. We hope you get a chance to play along with us – happy stamping!

PRIZE ALERT: After you're finished hopping with Stampendous, hop on over to Paper Craft Planet and learn how to create new stamp images with a bit of creative masking.... Getting More Bang for Your Buck with Stamping! Stampendous has generously offered a prize of Butterfly Post and Charm Collection Perfectly Clear Stamp set to one lucky Paper Craft Planet reader. Be sure to leave a comment on the correct Paper Craft Planet Blog post to be eligible!  Due to shipping restrictions, all winners must have a US/APO/FPO mailing address.


Saturday, November 19, 2011

Frantage Friday meets Stampendous Saturday

This week I'm combining two days into one...Frantage Friday and Stampendous Saturday! It was my turn to host this weeks Frantage Friday over at Paper Craft Planet and since I incorporated chipboard into it I figured it would be a great Stampendous Saturday post too.


I shared a fun technique...Crackle Paint with Elmer's Glue. No need to rush out to the store for supplies because chances are you have everything you need right in your craft space. Here is a video I created to highlight the technique...


Be sure to head on over to the Planet to check out the full tutorial and enter to win a sweet prize from Stampendous!

Check out what the Stampendous Design Team has cooked up for you this week's Chipboard Challenge..

Taylor Usry - http://taylorusry.blogspot.com/
Wendy Jordan - http://www.papertherapy-wendy.blogspot.com/
Suzanne Czosek - http://www.suzzstampingspot.blogspot.com/
Pam Hornschu - http://1pamperedstamper.blogspot.com/
Stampendous Blog -- http://stampendousblog.wordpress.com/

Friday, October 21, 2011

Happy Birthday Susanna!

We are celebrating in style today because today is Susanna's Birthday!!! Join us at Paper Craft Planet for  a week-long challenge event that every member on the Planet can participate in!

The Super Novas got together and each made a special birthday gift for Susanna's birthday. In honor of this momentous occasion, we invite everyone to post a birthday project or card for a chance to win some fabulous prizes! Yes, there are several chances to win some awesome paper crafting goodies just by posting a birthday themed project!

What better way to celebrate than with a bottle of wine! This Wine Bottle box was designed by the fabulous Adela Rossol! I used the Bottle of Cheer template to create a box. Instead of a place for a test tube, I altered the piece to create a box bottom with. 


Supplies Used:
template: Bottle of Cheer (Creations by AR)
stamps: Stampendous 
embossing powder: Stampendous
pattern papers: Prima


Further details can be found by clicking on The Planet Blog. Check out where the party is and join us for a week of celebrations!
Supplies Used
pattern papers:Prima papers
stamps: Skipping Stones Design
embossing powder: Stampendous 

Happy Birthday Susanna!!!

Friday, September 23, 2011

Frantage Friday at Paper Craft Planet...with a giveaway

Hi everyone! Stampendous and Paper Craft Planet have teamed up again to bring you Frantage Friday. I'm this weeks host and I'll be teaching you how to stamp on tissue paper & burlap. Its the same cool technique that I did on the Stampendous Santa Canvas a few months ago, where you Mod Podge the stamped tissue paper onto burlap to create an awesome textured stamped project. 


And if you look closely you'll see a sneak peek at one of the awesome new Class A Peel stickers Stampendous has coming out in October. They take ink beautifully! 


To see the full tutorial be sure to stop by the Back to Basics Stampendous Group (linked above) at Paper Craft Planet. If you're not already a member now is the time to join! There's a prize of Stampendous goodies for one lucky commenter over at the PCP group! 

Friday, July 15, 2011

Fran*tage Friday at PCP

Good morning! I'm back today to share the project that I created for this weeks Fran*tage Friday at Paper Craft Planet. If you're new to Fran*tage Friday, every Friday Paper Craft Planet and Stampendous team up to bring you projects and tutorials. 


I'll be showing you how to create Deep Impression stamping into melted embossing powder using Stampendous Deep Impression powder and rubber stamps. Head on over to the Paper Craft Planet Blog to see the tutorial and enter to win a sweet prize from Stampendous! 

Tuesday, July 5, 2011

Paper Craft Planet Riddersholm Project and PRIZE!

Hi everyone! Today I'm sharing a project that I made for Paper Craft Planet using this gorgeous line of papers and embellies from Danish scrapbooking company...Riddersholm Designs. I was given the Vintage Pink line to work with. Keep reading and you'll find out how to win a set of these papers! 


A complete list of instructions and supplies is given on the Paper Craft Planet Blog. Along with a fun image transfer technique using Mod Podge that I did using one of their paper tags. Can you spot the image transfer?


There is the image transfer on the "Y" pendant! I gave a soft slightly distressed look which was exactly what I was looking for to go with these vintage inspired papers!


Now onto the prize! How would you like to win a set of these gorgeous papers and embellishments of your own? All you have to do is head on over the Paper Craft Planet Blog and leave a comment. If you're not yet a member of Paper Craft Planet nows the time to join! Membership is free and there is always tons of inspiration and fun going on! 

Sunday, February 20, 2011

Paper Craft Planet Weekly Sketch- sk021911

Its my turn to create the sketch for Paper Craft Planet this week. I kept it pretty simple, just strips of pattern paper, with the only twist being a peek-a-boo bottom of transparency. (Scroll down to see the sketch.) We'd love to have you join us in the PCP challenges! Click on over to the PCP Blog and join in! 


For my card I used the sun image from Lizzie Anne Designs new set, Wonderful World. The image is only has a half circle of rays, but I wanted a full sun. Using the stamp positioner, I stamped & embossed it once. When it was cool, I spun the image, lined up the stamp positioner and stamped the sun again so the rays shined also on the other side. 


supplies used:
stamps: Lizzie Anne Designs (Wonderful World)
pattern paper: GCD Studios (yellow polka dot), Pebbles (flower strip) and Hambly (transparency)

Friday, November 5, 2010

Paper Craft Planet and Stampendous are teaming up....


Did you know that Paper Craft Planet and Stampendous are teaming up for the month of November to bring you loads of holiday gift ideas and inspiration? Be sure to come JOIN US for a complete list of instructions and supplies I used in the following project

Every year I try to come up with creative handmade gifts to accompany the baked goods I give my family and friends. I spend weeks trying to think of something and then usually the last week before the holidays rushing around trying to finish the projects. And every year I say I’m going to start earlier…no more last minute projects. LOL!  Join me today as I give you a glimpse at the gifts I’ll be crafting and giving out this year.

Stampendous has some FABULOUS holiday stamps for all your crafting projects. For this project I’ll be working with the Cling Mount Snowman Greeting Set (CRS3006).  As soon as I saw that cute snowman I thought the winter scene would be so cute stamped onto natural linen.  I’ve been wanting to embellish candles for a few years now, but thought the Snowman Greeting Set and the linen would be perfect for a candle wrap. And because the wraps just slip over the candle, when they’re done with the candle they can pull them off and use them on a new one.


a closeup of the adorable snowman....


and a closeup of the simple fabric leaves I used to embellish the lid with...


Saturday, September 25, 2010

Paper Craft Planet sketch sk092510

good morning! Hope everyone is having a fabulous fall weekend! I'm wondering if its too soon to pull out the Halloween decorations. How about a Halloween card and a new Paper Craft Planet sketch?

Today's card is one that I created for Lizzie Anne Designs using one of their older Christmas sets called Build a Bauble. Wondering how I used the Christmas set on this Halloween card? I used the ornament with the vertical lines on it. As I was creating cards with the set, I happened to glance over at a few pumpkin diecuts I still had on my desk from another project. hmmmmmm, might work. (wink) I masked off the top stem part and stamped the ornament in dark orange on the pumpkin. It was perfect for creating the lines of the pumpkin. I then went back and added some shading with colored pencils. The inside of the card uses the October mix, Sweet and Spooky. Love those polka dots! :)


Here is a closeup of the pumpkin...


We'd love to have you join us this week at Paper Craft Planet for the sketch challenge. Be sure to tag your creations sk092510 so they can be pulled into this weeks album. 


I'll be back later today with more cards and sketch! Its a busy busy day today! :)

Sunday, August 29, 2010

Paper Craft Planet sketch sk082810

Yay! Its the weekend! (gasp) I can't believe its been days since I blogged last. I've been busy on projects and just haven't been in a chatty mood. Are you up for some weekend stamping? I'm hosting the sketch this week over at Paper Craft Planet. I kept it simple but there's a twist to the challenge. You have to use a punch or two or three somewhere on the project. 


For my card I used the September Lizzie Anne Designs Monthly Mix....Treasured Trinkets.  Lots of fun images and quotes in the set. Not a Monthly Mix member yet? Lots of great perks for being a member. I used the quilt design as a background stamp and stamped it on different colors of paper. Next I punched lots and lots of 1 inch circles both with and without the pattern. I adhered them down, alternating them to create a cool pattern. I know I've mentioned this tip before but adhering them down to graph paper makes it so much easier to line up. I matted the main panel and popped it up with foam adhesive. 


We'd love to have you join as at Paper Craft Planet! If you do be sure to label your project sk082810 when you upload to the PCP gallery.